An ecommerce buying cart web page is most naturally a show of tabular knowledge, itemizing the title and worth for every merchandise a client has chosen. But HTML tables might be troublesome to learn on smartphones. Using a framework like Bootstrap will help enhance the cellular purchasing expertise.
In the context of cost movement, the ecommerce buying cart web page is a abstract of every little thing a client has chosen. It is the final cease earlier than beginning the checkout course of. Shoppers incessantly use the buying cart web page to evaluation their choices or make modifications.
Mobile-pleasant Cart Page
On a desktop or laptop computer pc display, a buying cart web page’s content material typically appears like a desk. In the instance picture under, there are two merchandise seen. Each is in its personal row. Each row has 5 columns, displaying a picture of the product, the product title, the unit worth (worth every), the amount chosen, and the entire worth for the product.
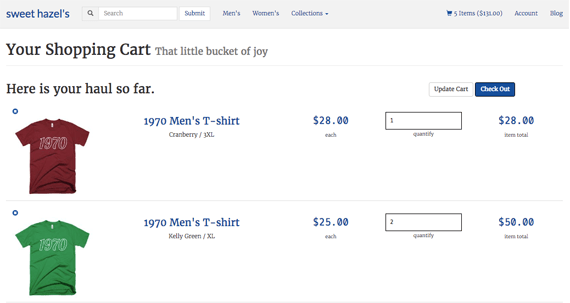
It is customary for an ecommerce buying cart web page to have a desk-like format with every merchandise in a row.
This desk-like format appears good on comparatively giant screens. But it doesn’t translate nicely on a smartphone.
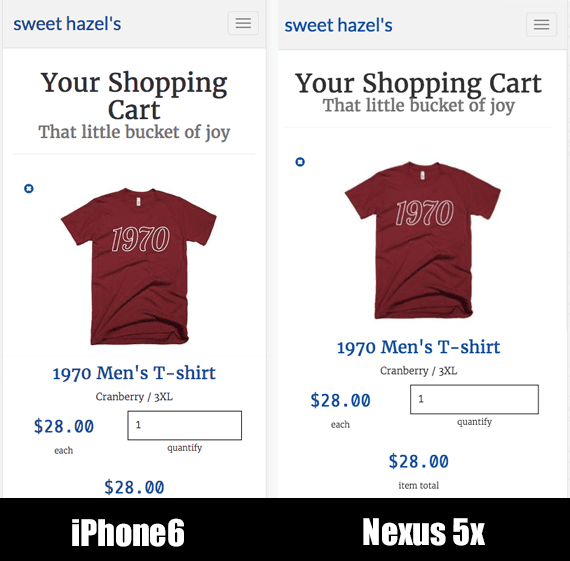
A cart web page format ought to adapt to a a lot narrower display measurement. In this instance, under, there are display simulations for an iPhone S and Nexus 5X. In each instances, the product info is displayed vertically, with the product picture on prime. The product title is subsequent, and extra product info is beneath that.
Tabular layouts might not work nicely on a comparatively small smartphone display. It could make extra sense to stack the knowledge.
In the stability of this text, I will describe how I constructed a responsive, cellular-first checkout web page for a Shopify retailer utilizing the Bootstrap O framework. The objective is to not offer you a recipe you could comply with step-by-step, however slightly to introduce you to Bootstrap and the way you may lay out a purchasing cart web page.
Basic Page Layout
The context for this text is a Shopify theme. There is a grasp format file, theme.liquid, which brings within the web page header, footer, CSS, and scripts. I am not going to cowl the particulars, simply know that Bootstrap is included and the header that seems in a number of the display captures comes from a separate file.
Shopify’s templating language is known as Liquid, thus the liquid extension. I will use a little bit of Liquid to assist get product info, however my emphasis might be on the HTML, CSS, and Bootstrap-particular courses.
<div class="container-fluid">
  <div class="row">
    <div class="col-xs-12">
      <div class="web page-header">
        <h1>Your Shopping Cart <small>That little bucket of pleasure</small></h1>
      </div>
    </div>
  </div><!-- finish .row -->
</div><!-- finish .container-fluid -->
This first part of HTML units up the Bootstrap grid. Notice the primary div aspect’s class, container-fluid. This class will make the format full width.
<div class=”container-fluid”>
  …
</div>
The subsequent div factor establishes the Bootstrap grid row. Out of the field, every row has 12 columns.
<div class=”container-fluid”>
  <div class="row">
    …
  </div>
</div>
The third div factor class is specifying the grid sort, sm, and the variety of columns. Bootstrap has an additional small (xs), small (sm), medium (md), and enormous (lg) grid choice. The instance class, col-xs-12, causes the enclosed content material to take up all 12 of the obtainable columns on the grid sizes.
<div class=”container-fluid”>
  <div class="row">
    <div class="col-xs-12">
      …
    </div>
  </div>
</div>
The content material on this first row is a web page header.
<div class="web page-header">
  <h1>Your Shopping Cart <small>That little bucket of pleasure</small></h1>
</div>
By default, Bootstrap will show the small textual content inline and align the complete web page header to the left. For a smartphone, I would slightly have the web page header centered and the small textual content seem by itself line. So I add two CSS directives to my very own stylesheet to override Bootstrap.
.web page-header
  textual content-align: middle;
.web page-header small
  show: block;
Bootstrap is cellular first. I subsequently place fashion directives for cellular units in the primary part of the CSS and put modifications for bigger screens in a media question. While I do choose the centered format on cellular, I like Bootstrap’s defaults higher for laptops and desktops. So I add the types under to undo my modifications on screens 768 pixels vast or wider.
/* Small units (tablets, 768px and up) */
@media (min-width: 768px)
  .web page-header
    textual content-align: left;
  .web page-header small
    show: inline;
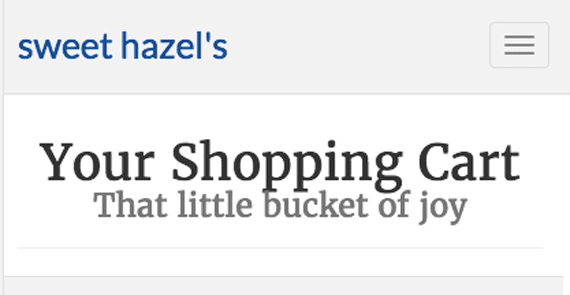
The purchasing cart web page shows the content material header. The customized CSS declarations middle the textual content and put the small subtitle by itself line.
The Shopping Cart Form
Next, I create a brand new row and arrange a 12-column large div component. This would be the mum or dad component, which can maintain the buying cart content material.
<div class="row">
  <div class="col-xs-12">
    …
  </div>
</div>
When a client visits the cart web page, I need to give him the chance to replace his alternatives. There are a couple of methods I might have achieved this, however right here I used a easy HTML type that may name the Shopify server when a change is made. This type ought to be nested inside the row and 12-column factor I simply wrote.
<div class="row">
  <div class="col-xs-12">
    <type motion="/cart" technique="submit" novalidate>
      ...
    </type>
  </div>
</div>
Nested Rows and the Cart Product Information
Just inside the shape factor, I insert a Shopify Liquid iteration tag. This Liquid tag will entry the cart object and loop over every product within the cart. Any code positioned inside the open and shutting Liquid tags can be repeated as soon as for every product within the cart. The present product within the loop shall be known as merchandise.
% for merchandise in cart.gadgets %
% endfor %
Bootstrap permits us to nest rows and columns inside rows and columns. Nesting makes it attainable to subdivide a web page. I’ve created a 12-column extensive div factor. I put a type inside it, and now I am going to subdivide that area to put out the product info.
% for merchandise in cart.gadgets %
<div class="row cart-row">
<div class="col-xs-12 col-sm-P">
<div class="pull-left">
<a href="/cart/change?line= forloop.index &amount=zero">
<span
class="glyphicon glyphicon-take away-signal"
aria-hidden="true"
></span>
</a>
</div>
<a href=" merchandise.url | inside: collections.all ">
<img
src=" merchandise | img_url: 'medium' "
alt=" merchandise.title | escape "
class="img-responsive"
>
</a>
</div>
</div><!-- finish .row.cart-row -->
% endfor %
There are some things to notice on this code block.
First, discover that the row div has a further class, cart-row. This is a category I created so as to add some customized types and overrides.
<div class="row cart-row">
Second, there are two column courses within the subsequent div aspect. Here, I am telling the browser (by way of Bootstrap courses) to make the enclosed content material refill all 12 columns when the display is lower than 768 pixels large. But when the display is 768 pixels extensive or wider (sm grid), I need the enclosed content material to only take up two of the 12 out there columns.
<div class="col-xs-12 col-sm-P">
Inside of this div component, I have a small hyperlink, which is supposed to take away the present merchandise from the purchasing cart and the product picture. Liquid does the heavy lifting right here. Do, nevertheless, discover that the picture has a category of img-responsive. This is a Bootstrap class that may modify the dimensions of the picture in order that it doesn’t overflow its mum or dad component.
To this code, I add three customized CSS declarations in my stylesheet. The first of those adjusts the row’s margin and padding, successfully overriding Bootstrap’s defaults. The third type description will middle the responsive picture in its mum or dad factor when that father or mother aspect is wider than the complete-sized picture.
.cart-row
  margin: 10px zero;
  padding: 10px zero;
  border-backside: 1px strong #e1e1e1;
.cart-row div
  textual content-align: middle;
.cart-row img.img-responsive
  margin: zero auto;
If we stopped to take a look at our purchasing cart web page to date, we might discover a comparatively giant product picture displayed for every merchandise within the cart.
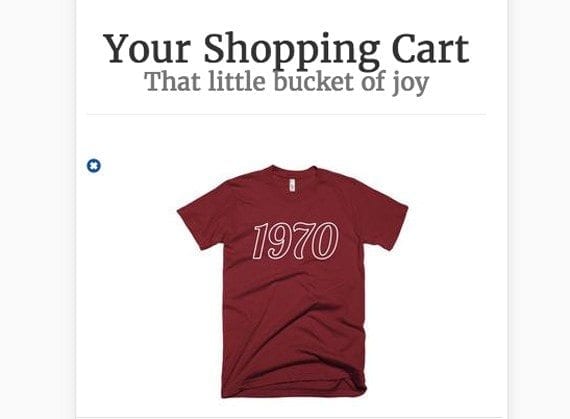
In the cellular format the product picture is displayed on the prime of every “row” of product info.
The subsequent part of markup will add the product identify, shade, and measurement. The div factor, once more, has two column specs. On a display narrower than 768 pixels, the title will take up the complete width (all 12 of the obtainable grid columns), however on a bigger display it’ll fill simply 4 of the obtainable grid columns.
<div class="col-xs-12 col-sm-A">
  <h3><a href=" merchandise.url "> merchandise.product.title </a></h3>
  % until merchandise.variant.title incorporates 'Default' %
     merchandise.variant.title
  % endunless %
</div>
The little bit of Liquid markup provides the product URL, title, and variant title, which, on this instance, is the dimensions and shade info.
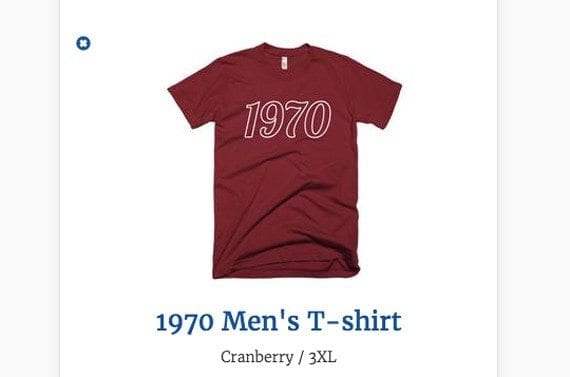
For every merchandise within the buying cart, the product identify and the colour and measurement mixture is displayed under the product picture.
From right here I am merely including blocks. Each block within the grid accommodates some details about a product within the cart.
The subsequent block, if you’ll, exhibits the unit worth for the product within the cart. Notice that it takes up 5 of the obtainable columns on the smallest of screens and two columns on bigger screens. Liquid will get the worth (which is saved in pennies) and converts it to dollars, together with the greenback signal and the decimal level.
<div class="col-xs-H col-sm-P">
  <h3 class="h3-worth">
     merchandise.worth | cash
  </h3>
  <small>every</small>
</div>
I need the worth to show in a particular font. So I use the customized h3-worth class. Here are the type declarations it references.
.h3-worth
  shade: rgb(20, eighty, one hundred fifty);
  font-household: 'Oxygen Mono', monospace;
Oxygen Mono is a free font out there on Google Fonts.
As an apart, Shopify permits me to make use of Sass, which is a preprocessor for CSS. Thus I am in a position to make use of variables to characterize issues just like the font shade and household. As a outcome, my precise SCSS (the Saas syntax), seemed like the next, and what you see can be the outcome after the CSS was processed.
@import 'https://fonts.googleapis.com/css?household=Oxygen+Mono';
$candy-blue-main: rgb(20, eighty, one hundred fifty);
$candy-monospaced: 'Oxygen Mono', monospace;
.h3-worth
  colour: $candy-blue-main;
  font-household: $candy-monospaced;
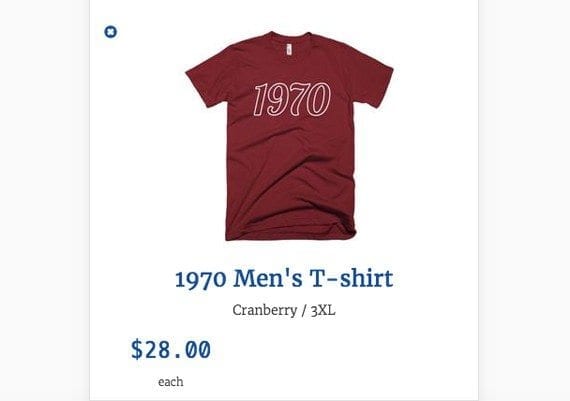
Since the worth block takes up simply 5 of the out there grid columns, it’s aligned to the left under the product identify and picture.
The subsequent part provides details about the amount chosen for a specific product within the cart. This block follows the identical sample as earlier blocks, though it does make use of a type enter factor.
<div class="col-xs-S col-sm-P">
  <div class="type-group">
    <enter
      sort="quantity"
      identify="updates[]"
      id="updates_ merchandise.id "
      worth=" merchandise.amount "
      min="zero"
     class="cart-qty-enter"
    >
    <small>amount</small>
  </div>
</div>
The div wrapping this block takes up seven of the out there 12 grid columns on additional small screens. When mixed with the unit worth div, which takes up 5 grid columns, all 12 columns might be crammed. On bigger screens the amount enter takes up two grid columns.
Note that the type-group class is constructed into Bootstrap and can present the essential types for the enter. The cart-qty-enter is my customized class. It overrides a number of the default Bootstrap types and provides a couple of of my very own. Notice the font household variable is one other instance of Sass CSS and requires the Sass preprocessor.
.cart-qty-enter
  font-measurement: 1em;
  font-household: $candy-monospaced;
  margin-prime: 10px;
  padding: 10px;
  width: ninety five%;
  border: 1px strong black;
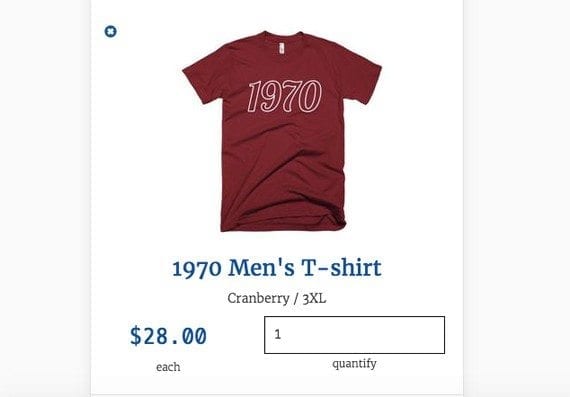
The variety of models chosen or amount lays out to the suitable of the worth on the identical line.
If we maintain with the block analogy, the ultimate block will present the entire for a given product. There is nothing new right here.
<div class="col-xs-12 col-sm-P">
  <h3 class="h3-worth">
     merchandise.line_price | cash
  </h3>
  <small>merchandise complete</small>
</div>
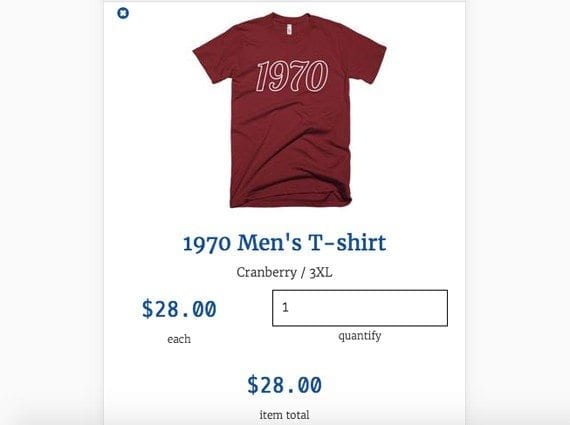
The complete worth for this merchandise within the cart is proven on the backside. In this instance, because the amount is one, the unit worth and complete worth are the identical. If the amount had been larger, the whole worth would have been higher.
Summing Up
With only a little bit of HTML and CSS and a few assist from Bootstrap, I was capable of create a great wanting cart web page that shows product info vertically on small cellular screens, however like a desk on comparatively bigger screens.
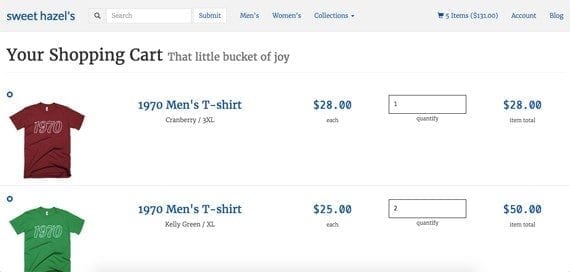
On bigger screens, Bootstrap’s grid lays out the merchandise within the cart like a desk.


