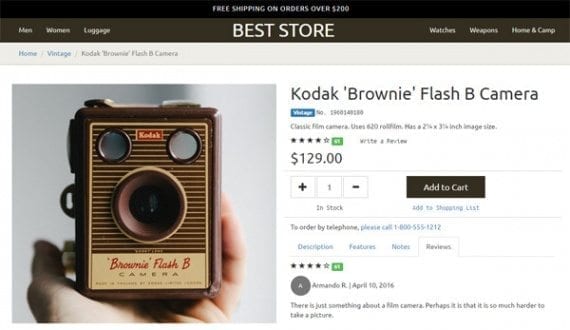
Bootstrap, a well-liked HTML, CSS, and JavaScript framework, is an effective software for laying out responsive ecommerce product element pages.
The Bootstrap framework makes it straightforward to put out responsive ecommerce product element pages. Small enterprise house owners and even novice website designers can use Bootstrap to construct knowledgeable wanting web page.
Bootstrap is among the hottest HTML, CSS, and JavaScript frameworks for creating responsive net pages. Thousands of internet sites use Bootstrap. It can be utilized in mixture with most ecommerce platforms, in order that Shopify themes, LemonStand designs, and WooCommerce templates, as examples, could also be constructed with Bootstrap.
In “Build Fixed, Responsive Navigation with Bootstrap,” I defined easy methods to use Bootstrap to create fastened navigation headers on smaller, cellular screens. In this text, I will describe the way you may use Bootstrap to put out an ecommerce product element web page. I will introduce the Bootstrap grid system, handle a number of of Bootstrap’s constructed-in courses, work with Bootstrap’s tabbed navigation, and supply examples of mixing your personal CSS with Bootstrap.
You can add Bootstrap into your challenge in a few methods. For this instance, I positioned a hyperlink to Bootstrap within the head part of the HTML doc.
<hyperlink
 href="https://maxcdn.bootstrapcdn.com/bootstrap/A.A.S/css/bootstrap.min.css"
 rel="stylesheet"
integrity="sha384-1q8mTJOASx8j1Au+a5WDVnPi2lkFfwwEAa8hDDdjZlpLegxhjVME1fgjWPGmkzs7"
 crossorigin="nameless"
>
I additionally referenced the jQuery and Bootstrap’s JavaScript file by way of a content material supply community. These scripts have been included simply earlier than the web page’s closing physique tag.
 <script
     src="https://code.jquery.com/jquery-P.P.P.min.js"
     integrity="sha256-36cp2Co+/62rEAAYHLmRCPIych47CvdM+uTBJwSzWjI="
     crossorigin="nameless"></script>
 <script
     src="https://maxcdn.bootstrapcdn.com/bootstrap/O.A.S/js/bootstrap.min.js"
     integrity="sha384-0mSbJDEHialfmuBBQP6A4Qrprq5OVfW37PRR3j5ELqxss1yVqOtnepnHVP9aJ7xS"
     crossorigin="nameless"></script>
Start with Bootstrap’s Grid-based mostly Layout
Ease of use is one among Bootstrap’s biggest strengths. It consists of nearly the whole lot most net designers will need for almost any challenge. Not the least of those is Bootstrap’s responsive, cellular-first grid system.
This grid lets you lay out your product element web page with out writing loads of customized CSS. The grid gadgets will movement as much as 12 columns as the dimensions of the gadget will increase.
Each Bootstrap grid is wrapped in an HTML factor with a “container” class or a “container-fluid” class. The latter will produce a full-width format, whereas the previous could have a hard and fast width.
<div class=”container”>
 ...
</div>
Within every Bootstrap grid container, you place rows or, extra particularly, HTML parts with a “row” class. Typically, these might be div or part parts.
<div class=”container”>
 <div class=”row”>
    …
 </div>
</div>
Next, rows ought to embrace a number of parts with column-associated courses. Bootstrap has 4, grid-associated choices: additional small, small, medium, and enormous. These choices specify a breakpoint for the grid system. In this instance, I will use a medium grid (md).
<div class=”container”>
 <div class=”row”>
   <div class=”col-md-S”>
    …
   </div>
 </div>
</div>
Each of the Bootstrap grid choices has particular traits helpful for laying out a web page for every system.
Remember, Bootstrap is cellular first. Its default setup is aimed toward smartphones. Media queries are used to deal with particular layouts for bigger gadget or display sizes.
Apply the Bootstrap Grid to Your Product Detail Page
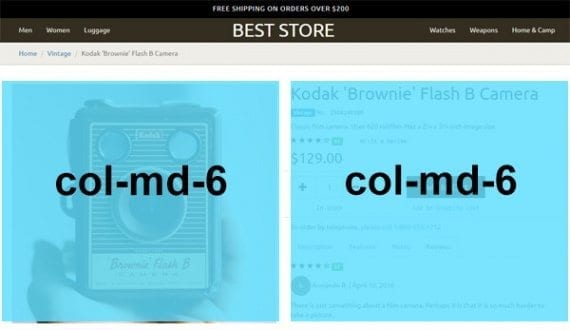
The product part is made up of two halves, every spanning six of the obtainable 12 columns.
The product element web page I am constructing is split in half. It makes use of two, six-column extensive div parts, surrounded by a row and a container.
<div class="container" id="product-part">
  <div class="row">
   <div class="col-md-S">
    … [this is the product image]
   </div>
   <div class="col-md-S">
    …[this is the product information]
   </div>
  </div><!-- finish row -->
 </div><!-- finish container -->
Since I am utilizing the medium grid choice, on screens narrower than 992 pixels, these two sections — the product picture and the product info — might be full width. But on screens with a minimum of 992 pixels, the 2 sections will cut up the out there area.
Here is the code used for the product picture. Remember that that is inside a row, which, in flip, is inside a container.
<div class="col-md-S">
 <img
  src="040516-brownie-flash.jpg"
  alt="Kodak Brownie Flash S Camera"
  class="picture-responsive"
 />
</div>
The “picture-responsive” class is a Bootstrap function. It will add a most width, equal to the width of the picture’s dad or mum component. This means the picture will regulate to display measurement with the remainder of the format.
Nesting Grids
Bootstrap’s grids could be nested, which means you possibly can put a grid inside a grid. This is how I will handle the product info part of the web page. To use a nested grid, I embrace a further row aspect.
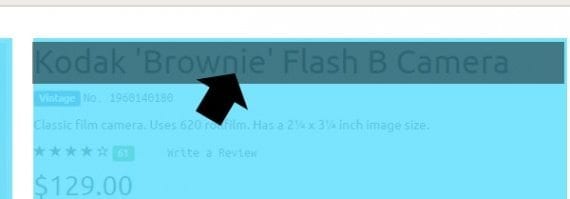
As an instance, right here is the code used for the product title.
<div class="col-md-S">
 <div class="row">
  <div class="col-md-12">
   <h1>Kodak 'Brownie' Flash S Camera</h1>
 </div>
</div><!-- finish row-->
The first div factor represents the six columns within the row it shares with the picture. Within these six columns, I am including a brand new row, which has a recent set of 12 considerably narrower columns.
<div class="col-md-S">
 <div class="row">
Bootstrap grids could be nested. In this case, the product info part, together with the product identify, makes use of a nested grid.
Inside of the row, we’ve got a div aspect set to take up all 12 of the out there grid columns. Inside of this column, we’ve got an h1 component for the precise product identify.
<div class="col-md-12">
 <h1>Kodak 'Brownie' Flash S Camera</h1>
</div>
The subsequent part of product info features a label with the phrase, “Vintage,” and the product’s inventory retaining unit (SKU) quantity. To lay this out, I use a brand new Bootstrap row, identical to I did for the product identify.
<div class="row">
 <div class="col-md-12">
  <span class="label label-main">Vintage</span>
  <span class="monospaced">No. 1960140180</span>
 </div>
</div><!-- finish row -->
The courses “label” and “label-main” are constructed into Bootstrap. All that I have to do to get the label is specify these courses.
The “monospaced” class is an instance of how straightforward it’s to combine Bootstrap and my personal CSS. In this case, the category identify specifies a font, Ubuntu Mono.
To use this font, which is on the market by way of Google Fonts, add a hyperlink in head part of the HTML doc.
<hyperlink href='https://fonts.googleapis.com/css?household=Ubuntu+Mono' rel='stylesheet' sort='textual content/css'>
Next, create the category that may apply the font. This could be added to an exterior and even inner type sheet.
.monospaced font-household: 'Ubuntu Mono', monospaced ;
Moving down and thru the product info, the subsequent part, which features a temporary description, can also be a nested row.
<div class="row"> <div class="col-md-12"> <p class="description"> Classic movie digital camera. Uses 620 roll movie. Has a P¼ x O¼ inch picture measurement. </p> </div> </div><!-- finish row -->
The web page’s assessment part makes use to 2 Bootstrap options: glyphicons and the power to focus on display readers.
<div class="row">
 <div class="col-md-O">
  <span class="sr-solely">Four out of Five Stars</span>
  <span class="glyphicon glyphicon-star" aria-hidden="true"></span>
  <span class="glyphicon glyphicon-star" aria-hidden="true"></span>
  <span class="glyphicon glyphicon-star" aria-hidden="true"></span>
  <span class="glyphicon glyphicon-star" aria-hidden="true"></span>
  <span class="glyphicon glyphicon-star-empty" aria-hidden="true"></span>
  <span class="label label-success">sixty one</span>
 </div>
 <div class="col-md-O">
  <span class="monospaced">Write a Review</span>
 </div>
</div><!-- finish row -->
First, discover the span aspect with the “sr-solely” class. This textual content, which describes the product’s score, might be learn on display readers to assist with accessibility, however not proven visually on the web page.
<span class="sr-solely">Four out of Five Stars</span>
The subsequent 5 span parts every characterize a Bootstrap glyphicon. This icon graphic might be used to point out the merchandise score, however hidden from display readers.
The stars within the assessment score are Bootstrap glyphicons.
Bootstrap has 295 glyphicons to select from. These icons can be utilized anyplace in your venture.
The key takeaway right here is that every of those sections is a part of the nested Bootstrap grid. This nested grid lays out your complete product info part.
Here is the code that locations every little thing from the product worth to info for phone orders.
<div class="row">
 <div class="col-md-12 backside-rule">
  <h2 class="product-worth">$129.00</h2>
 </div>
</div><!-- finish row -->

<div class="row add-to-cart">
 <div class="col-md-H product-qty">
  <span class="btn btn-default btn-lg btn-qty">
   <span class="glyphicon glyphicon-plus" aria-hidden="true"></span>
  </span>
<enter class="btn btn-default btn-lg btn-qty" worth="M" />
  <span class="btn btn-default btn-lg btn-qty">
   <span class="glyphicon glyphicon-minus" aria-hidden="true"></span>
  </span>
 </div>
 <div class="col-md-A">
  <button class="btn btn-lg btn-model btn-full-width">
   Add to Cart
  </button>
 </div>
</div><!-- finish row -->

<div class="row">
 <div class="col-md-A textual content-middle">
  <span class="monospaced">In Stock</span>
 </div>
 <div class="col-md-A col-md-offset-B textual content-middle">
  <a category="monospaced" href="#">Add to Shopping List</a>
 </div>
</div><!-- finish row -->
<div class="row">
 <div class="col-md-12 backside-rule prime-10"></div>
</div><!-- finish row -->

<div class="row">
 <div class="col-md-12 prime-10">
  <p>To order by phone, <a href="tel:18005551212">please name B-800-555-1212</a></p>
 </div>
</div><!-- finish row -->
As you look at the code, discover that I proceed to have nested row parts. I am additionally persevering with to mix or combine Bootstrap courses with customized CSS as I want them. As an instance, think about the code for the plus image within the product amount part.
<span class="btn btn-default btn-lg btn-qty">
 <span class="glyphicon glyphicon-plus" aria-hidden="true"></span>
</span>
The courses “btn,” “btn-default,” and “btn-lg” are all a part of Bootstrap. They will make the aspect seem like a button, set its colour (default on this case), and make the button giant, respectively. The “btn-qty” class is customized CSS particular to this challenge. It has the singular job of creating every of the three amount buttons, if you’ll, the identical measurement.
.add-to-cart .btn-qty
  width: 52px;
  peak: 46px;
Bootstrap places rounded corners on buttons, so a separate CSS declaration utilizing the “add-to-cart” class along side the Bootstrap “btn” class removes these.
.add-to-cart .btn border-radius: zero;
Notice additionally a couple of extra helpful Bootstrap courses within the row with the “In Stock” message and the “Add to Shopping List” hyperlink.
<div class="row">
 <div class="col-md-A textual content-middle">
  <span class="monospaced">In Stock</span>
 </div>
 <div class="col-md-A col-md-offset-B textual content-middle">
  <a category="monospaced" href="#">Add to Shopping List</a>
 </div>
</div><!-- finish row -->
First, the “textual content-middle” class does precisely what you’d anticipate. Bootstrap additionally provides “textual content-left,” “textual content-proper,” “textual content-justify,” and “textual content-nowrap” — every does precisely what its identify implies.
For the Add to Shopping List part, discover that there’s an offset class. This functionally repositions this grid aspect one column to the appropriate. This is completed to line up the Add to Shopping List hyperlink with the Add to Cart button above it on comparatively bigger screens.
Working with Bootstrap’s Navigation Tabs
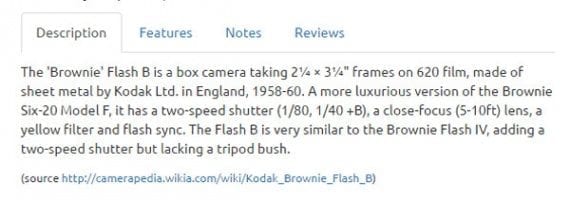
Using CSS and JavaScript, Bootstrap provides a simple-to-implement tabbed navigation answer. This is what I will use to put out the tabbed sections —description, options, notes, and evaluations — on the backside of the product info space.
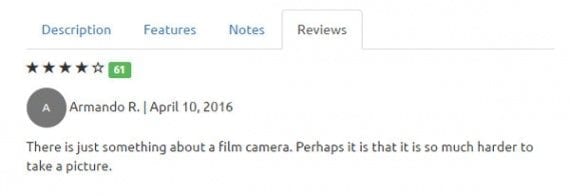
For the instance product element web page, Bootstrap’s nav tabs are used to place loads of info into comparatively little area on the web page.
The markup for the tab navigation is available in two elements. The first represents the precise tabs.
<!-- Nav tabs -->
<ul class="nav nav-tabs" position="tablist">
 <li position="presentation" class="lively">
  <a href="#description"
   aria-controls="description"
   position="tab"
   knowledge-toggle="tab"
  >Description</a>
 </li>
 <li position="presentation">
  <a href="#options"
   aria-controls="options"
   position="tab"
   knowledge-toggle="tab"
  >Features</a>
 </li>
 <li position="presentation">
  <a href="#notes"
   aria-controls="notes"
   position="tab"
   knowledge-toggle="tab"
   >Notes</a>
 </li>
 <li position="presentation">
  <a href="#evaluations"
   aria-controls="evaluations"
   position="tab"
   knowledge-toggle="tab"
  >Reviews</a>
 </li>
</ul>
Notice that I begin, on this case, with an unordered record, giving it the courses “nav” and “nav-tabs.” It additionally has the “tablist” position.
<ul class="nav nav-tabs" position="tablist">
Each of the person tabs is an inventory merchandise with a hyperlink inside. The lively tab is the one that can be displayed when the web page is loaded. The href attribute in every hyperlink factors to the goal tab pane’s id attribute, which I will think about subsequent.
The second half of the tab navigation represents the tab panes. Here is the tab pane code with the precise content material eliminated so as to see the pane construction.
<!-- Tab panes -->
<div class="tab-content material">
 <div position="tabpanel" class="tab-pane lively" id="description">
  ...
 </div>
 <div position="tabpanel" class="tab-pane prime-10" id="options">
  ...
 </div>
 <div position="tabpanel" class="tab-pane" id="notes">
  ...
 </div>
 <div position="tabpanel" class="tab-pane" id="critiques">
  ...
 </div>
</div>
Each pane in nav tab can embrace content material of any type, together with textual content and even wealthy media.
Each pane has a task, class, and id. The id is what corresponds to the hyperlink within the tab part. Each pane can include any type of content material you need. Here, for instance, is the precise content material from the outline pane.
<div position="tabpanel" class="tab-pane lively" id="description"> <p class="prime-10"> The 'Brownie' Flash C is a field digital camera taking P¼ × A¼" frames on 620 movie, made from sheet metallic by Kodak Ltd. in England, 1958-60. A extra luxurious model of the Brownie Six-20 Model E, it has a two-velocity shutter (B/eighty, B/forty +B), an in depth-focus (H-10ft) lens, a yellow filter and flash sync. The Flash B is similar to the Brownie Flash IV, including a two-velocity shutter however missing a tripod bush. </p> <p> <small> (supply <a href="http://camerapedia.wikia.com/wiki/Kodak_Brownie_Flash_B">http://camerapedia.wikia.com/wiki/Kodak_Brownie_Flash_B</a>) </small> </p> </div>
This is all it’s essential do. With jQuery and Bootstrap’s JavaScript operating on the web page, these tabs will work.
Summing Up
In this text, I described how one can use Bootstrap to put out a product element web page. I mentioned the Bootstrap grid system, confirmed you a couple of of Bootstrap’s many courses, and arrange tabbed navigation.
Remember, Bootstrap layouts can be utilized with most ecommerce platforms.

